In part one of this three part series we laid the foundation for a magazine-style home page in Drupal. This week we are going to get our hands dirty by digging into CCK and Views. Get out your pocket protectors, this one is a little geeky!
Vocabulary settings
The first thing you will need to do is make sure that the Story content type has the two vocabularies that we created in part one. Go to Content management » Taxonomy and click on the edit vocabulary link next to Categories. Select the Story checkbox under content types. Next, check the Multiple Select checkbox below Settings. You can clear the other checkboxes in this section. Now hit save and move on to the Tags vocabulary.
The Tags vocabulary also needs to be available to the Story content type. Under settings, select both the Tags and Multiple Select checkboxes. This will allow us to free-tag a Story.
Extending Content Types with CCK
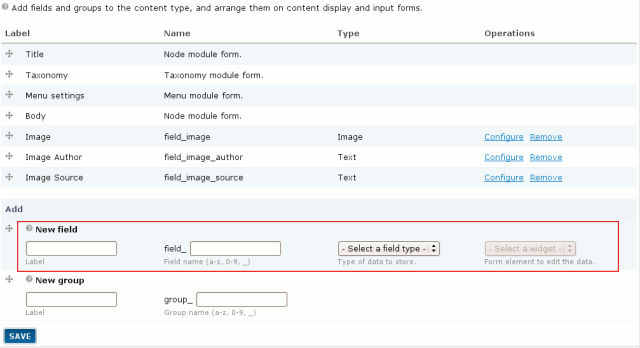
In order to take advantage of the ImageCache module you will need to extend the Story content type with CCK. At the very least, you will need to add an Image type field. If you ever use Creative Commons licensed photography you will want to credit the Author and Source. It can be useful to add these as fields so that you do not have to remember a special format every time.
Add the following fields to the Story content type by going to Content Management » Content Types and then clicking the Manage Fields link next to Story.
| Label | Field Name (prefixed field_) | Type of Data to Store | Form element to Edit Data |
|---|---|---|---|
| Image | image | Image | Image |
| Image Author | image_author | Text | Text Field |
| Image Source | image_source | Text | Text Field |

Toward the bottom of the page, you will see several input boxes. In the New Field section, enter the settings in the table above. Views will automatically prefix the field name with field_, so you do not need to include that part.
After you hit save there are, only two things that you need to configure on the next page. If you prefer, you can configure the Path Settings to put uploaded images into a subdirectory. I like to get clever here and put my images in a directory called—you guessed it—images! The other optional setting is the ALT text. Be nice to your disabled users and select this box. Finally, save the field settings.
Add the Image Author and Image Source fields using the data in the table. The options are up to you. I like to limit the amount of text that can go into one text box to 255 characters. That is all that you need to configure for Content Types. Next up is the hard part, creating the views that will display the content on your homepage.
Creating the views
Views seem to be one of the most powerful and yet most confusing modules there are. The overhauled Views module looks good but I found it startling at first. There is a LOT that you can do with it.
If you are feeling lazy you can just import the views by copying the export code provided and then pasting into the form under Site Building » Views » Import. Imports do not usually work well for me, so you are on your own.
Warming up with the headline view
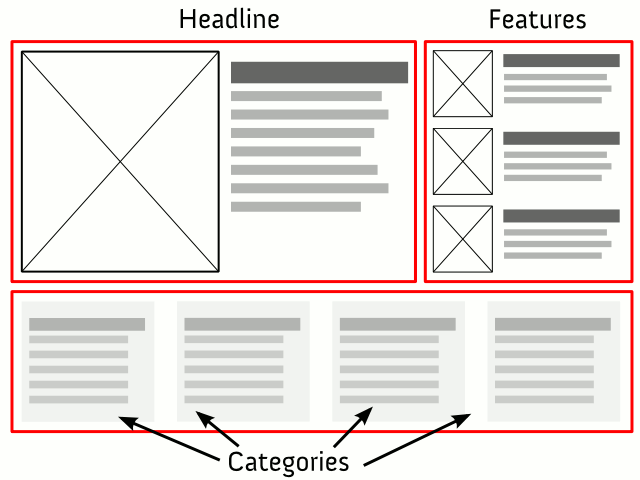
The headline view will display a single post with a nice big image. This is for your most important stories only. Go to Site Building » Views » Add. The View name should be “Headline” and the description can be anything you would like. I used “Display a single post teaser and medium size image in the Headline category.” A tag is optional but may help you find your views quicker if you have a lot of them. Finally, select the Node View type and press the Next button.
On the next page, you will begin to configure the view settings by selecting the Block display type from the drop down. Next, click the Add Display button. Views will create a new display type that uses the default settings. You will only need to configure the Basic settings, Fields and Filters for the headline view.

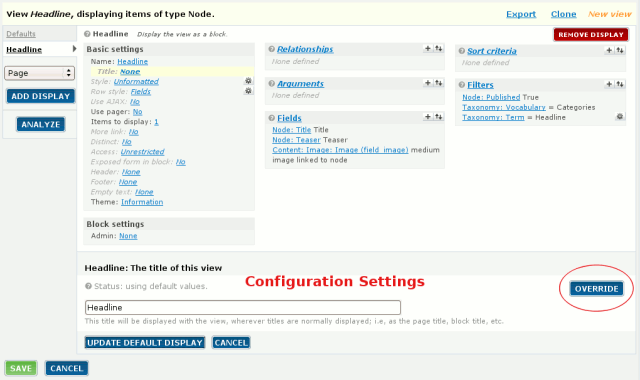
You can change each of these settings by clicking the setting’s link or gear icon. Views will display the configuration options below the settings. The tricky thing about the configuration options is that you have to look for the Override button on the right side of the editing area. Because you did not set any default values, you will usually want to override the setting by clicking this button. Remember to click the Save button or your changes will be lost.
Configure the Headline view with the following settings:
Basic settings
- Name: Headline
- Title: None
- Style: Unformatted
- Row style: Fields
- Use AJAX: No
- Use pager: No
- Items to display: 1
- More link: No
- Distinct: No
- Access: Unrestricted
- Exposed form in block: No
- Header: None
- Footer: None
- Empty text: None
- Theme: Information
To set the Fields you will need to click the little + icon beside the Fields header text. You can use the drop down to display only relevant Fields but I have found that it is just as easy to scroll through the list. You will need to select the following fields and then click Add.
Fields
| Field | Notes |
|---|---|
| Content: Image: Image (field_image) | Label: none Format: medium image linked to node |
| Node: Teaser | No additional configuration required |
| Node: Title | Check Link this field to its node |
Filters
| Field | Notes |
|---|---|
| Node: Published | True |
| Taxonomy: Term | Vocabulary: Categories Selection Type: Drop down Operator: Is one of Select terms from vocabulary Categories: Headline |
Remember to click the Save button!
The Features View
The features view displays three excerpts each with their own thumbnail image. You will configure it to show the three most recent stories marked as a Feature.
Basic settings
Basic settings
- Name: Block
- Title: Features
- Style: List
- Row style: Fields
- Use AJAX: No
- Use pager: No
- Items to display: 3
- More link: No
- Distinct: No
- Access: Unrestricted
- Exposed form in block: No
- Header: None
- Footer: None
- Empty text: None
- Theme: Information
Fields
| Field | Notes |
|---|---|
| Content: Image: Image (field_image) | Label: none Format: thumbnail image linked to node |
| Node: Teaser | No additional configuration required |
| Node: Title | Check Link this field to its node |
Sort criteria
| Field | Notes |
|---|---|
| Node: Post date | asc |
Filters
| Field | Notes |
|---|---|
| Node: Published | True |
| Taxonomy: Term | Vocabulary: Categories Selection Type: Drop down Operator: Is one of Select terms from vocabulary Categories: Featured |
Remember to click Save!
Posts by Category
This view is a little tricky. It will display the last five posts for each category. The difference is that you will not add the view to a region. Instead, you will hard-code the calls to it in the front-page template file. Add a new view called posts_by_category with a display type of Node. You can just use the default display type instead of creating a block.
Basic settings
- Name: Defaults
- Title: None
- Style: List
- Row style: Fields
- Use AJAX: No
- Use pager: No
- Items to display: 5
- More link: No
- Distinct: No
- Access: Unrestricted
- Exposed form in block: No
- Header: None
- Footer: None
- Empty text: None
- Theme: Information
Arguments
| Field | Notes |
|---|---|
| Taxonomy: Term | Action to take if argument is not present: Display all values Validator:<Basic Validation> Action to take if argument does not validate: Hide view/Page not found (404) |
Fields
| Field | Notes |
|---|---|
| Node: Title | Check Link this field to its node |
Filters
| Field | Notes |
|---|---|
| Node: Published | True |
Smooth Sailing
If you made it this far, you have done well. The good news is that was the hardest and most tedious part. It is smooth sailing from here on out. Next week we will wrap up the series by themeing the views and adding some CSS to spruce things up.

 I am using the