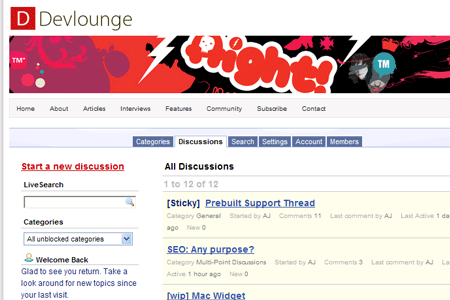
Since the recent launch of the Devlounge forums*, I have been receiving countless emails and requests asking me how I integrated WordPress and Vanilla. I decided what better way to get the word out then provide a quick instructional guide on how to do such a thing.

What is Vanilla
For those of you that don’t know about Vanilla, you’re missing out on a great thing. In a world were (good) free forum software has almost became non-existent, Vanilla steps up and shows its strengths. The great thing about Vanilla is how easily extensible it is, and how straight forward, clean, and compact (the download is under 400kb!).
Understanding the skin system
Like most forum scripts, Vanilla support multiple styles (or skins, themes, whatever you’d like to call them). These styles can be selected from the admin panel, and changed on a site wide basis.
The difference of Vanilla is its use of one group of centralized files. These files are used with every theme, and theme colors and layout are controlled by individual stylesheets, rather than a group of template files with each theme.
For example, after you download Vanilla, you will see a “themes” folder. Inside, you’ll find a folder called vanilla and a bunch of different vanilla based template files. Take special note of head.php, foot.php, and panel.php. These are the three main files we will be editing.
If you continue into the Vanilla folder, you’ll find a folder inside called styles, which then leads to more folders, in this case after a fresh download, default. You besides a whole bunch of folders, who do you customize this baby?
The concept is actually a lot easier then it appears. Vanilla is all about organization, which is why even a themes folder is broken down into so many sub-folders. There are two sets of ways to customize different aspects of vanilla:
CSS Customizing Only
- Copy the “default” folder and rename the copy to something else, say “myskin”.
- Now, it is safe for you to edit all the css and images. Keep in mind that Vanilla will use this skin on it’s default group of template files, so the css tweaks do have their limitations depending on what you want to accomplish.
Template & CSS:
- Copy the “vanilla” folder found inside “…/themes”. Rename the new folder to something, say “mytheme”.
- Now that you’ve created a copy of the vanilla folder and all it’s content, you are now safe to go ahead and customize both the template files found inside and the stylesheets used for the theme.
- The main files you will find yourself using to get the theme to match your site are head.php, foot.php, and panel.php.
- Once you customize a template file, upload it to the newly created theme folder, such as “mytheme”. Vanilla checks to see if any template files exist inside a theme folder, and if they don’t, it uses the base template files.
Integrating Vanilla & WordPress
One thing to make clear here, Vanilla & WordPress are not fully integrated, it is simply the design. In the future, there will probably be a way to integrate WordPress & Vanilla fully, included users.
Anyways, how did I get vanilla to match devlounge? Let’s first open up the head.php in our “…/themes” folder and in our current WordPress themes folder (header.php).
Upon opening Vanilla’s head.php, down towards the end (lines 31-35), you’ll see some php with references to “body”. This is where vanilla is calling style information for the sites body, and where Vanilla will begin.
In our case, here we wanted to wrap the forum script with our sites background, as well as include the logo, header, and site navigation. A quick switch to the wordpress header.php, and look below the body tag, and the code we saw looked like this:
[html]
[/html]
To give the board the same width as a header, we added a new css class and inserted it just below the code above, along with a div clear just to be on the same side. Back to Vanilla’s head.php, we added everything above right below the last line of head.php. It looked like this: (the first few lines are the last lines of Vanilla’s head.php.)
[php]$BodyId = “”;
if ($this->BodyId != “”) $BodyId = ‘ id=”‘.$this->BodyId.'”‘;
echo $HeadString . ‘
?>
Now we needed to open Vanilla’s foot.php to close our two open divs, the div “wrap” and “theboard” div. Once you open the foot.php file, you’ll notice there is no reference to the end body and html tags. These are included in page_end.php, which we’ll leave untouched. To close off the two open tags we had, we added this to the very end of foot.php:
[html]
[/html]
Once we had this all taken care of, the devlounge forums were now matching the site, making it seem like everything was perfectly integrated. One thing you have to remember is to insert whatever css you need for your site into the vanilla.css for whatever theme you’re using. You can also take this one step farther and customize the people.php to match your site, as we did. This makes registering also match your sites interface.
This doesn’t have to be just for integrating Vanilla and WordPress either. By following the same basic rules, you can edit Vanilla to match your site as long as you have basic code and css knowledge. Hopefully this guide is useful in the customization process. Please use the comments for any questions, comments, or thoughts on this guide you may have, or some of your own customizing tips.
* Note: As of August 15th, the Devlounge Community was removed to allow expansion before we pick up with a community again. This guide is still accurate and current.
