• Home
  • About
  • Contact
  • Advertise

Devlounge

Design, Develop, and Grow

ateşli sevgilisi fantezisini yaşamak istediğini söyler porno ona arkadaşları varken onunla gizli saklı seks yapmak istediğini sikiş söyleyen kız hafta sonu için gelen arkadaşının görmediği bir sikiş açıdan sakso çekmeye başlayınca adamın yarağını bu altyazılı porno şekilde indiremez ve açık şekilde salonda sikişimeye sex izle başladıklarında misafir kızı da bu sekslerine rokettube konuk ederler seks yapacağını düşünmeyerek onun sex izle oyun oynadığını zanneder sabah olur ve herkes uyanır hd porno bu sırada yanında şişme mankenini de getiren sapık erotik hikayeler genç sınav haftası ders çalışan genç adam üvey annesinin sikiş eve gelmesiyle hayatının şokunu yaşar

  • Home
  • Code
  • Design
  • Design Focus
  • Interviews
  • Publishing
  • Strategy
  • Webapps
  • Extras

Danger Will Robinson! ~Status Bar Alerts~

February 6, 2008 By Brian Self

The text that appears in the bottom left corner of your browser are called status bar alerts. Normally these are just messages that come from the browser it self pertaining to the functions of loading the website but it is good to look at what would be normal, boring functions of technology and come up with ways for it to communicate with your audience and further your brand.

I will show you how to throw in a static message in the bottom left corner of the browser but keep in mind that this only works in Internet Explorer as we are using the window.status object.

For a static message on the status bar we will use this piece of Javascript code:

[html]

Status Bar Alert


[/html]

First the message is thrown into the variable statusbarmessage which is used as the parameter by window.status in statustype. The code activates in the body using onload and everytime that the page is displayed.

You can also do the same thing by deleting the variable var statusbarmessage and chucking the “PUT YOUR MESSAGE HERE” within quotes straight into the window.status.

E.g: window.status="PUT YOUR MESSAGE HERE"

However that is not good programing practice as future requirements could not be incorporated without having to re-write the code. I hope this helps you if you ever wondered how in the heck other designers were able to put messages down there!
Crash Course in Favicons

January 31, 2008 By Brian Self

Favicons have come a long way since they were first introduced in Internet Explorer. The favicon was created by Microsoft for Internet Explorer but at that time it did not conform to the W3C HTML recommendation because the rel attribute has to contain a space-delimited list of link types, the .ico didnt have a registered MIME type and using a reserved location is what is know as link squatting or URI squatting to the W3C.

When someone looks through their bookmark links or at the address bar and sees your logo or image as the favicon on your site, it shows that you care to go the extra mile when it comes to design and branding.

Before, these 16 by 16 pixel images placed in the root of a server, were called favicon.ico and were only used for bookmarks. This brought about a security concern among website visitors since webmasters could see the amount of people that had bookmarked the site by taking a peek at the access logs and see how many downloaded the favicon.ico file. Now browsers just display the favicon in the address bar on every visit making it less of a security issue. The image formats have expanded as well to included animated gifs and PNG’s. Although putting the favicon at the root of a server is still sometimes practiced, it is generally perfered that you use a piece of html in the <head> section that points to the location of the favicon. It looks like this:

<link rel="shortcut icon" href="http://yoursite.com/favicon.ico" mce_href="http://yoursite.com/favicon.ico" type="image/vnd.microsoft.icon">
<link rel="icon" href="http://yoursite.com/favicon.ico" mce_href="http://yoursite.com/favicon.ico" type="image/vnd.microsoft.icon">

Or if your document is XHTML, you use this:

<link rel="icon"
      type="image/png"
      href="/somewhere/myicon.png" />;

Now although it is not 100% guaranteed that the favicon will always display on every browser every time, I believe it to be a good practise to integrate on into your website. When someone looks through their bookmark links or at the address bar and sees your logo or image as the Favicon on your site, it shows that you care to go the extra mile when it comes to design and branding. In website design, image is everything so why not put your image everywhere!

Pulling XML into Flash

January 22, 2008 By Brian Self

When developers and designers start really utilizing the power of flash and the potential it can bring to applications and creative content, a question that frequently arises is how to load data in from a xml page and use it in Flash. This is a quick tutorial to show how easy the process is and once you have these basics the possibilities are endless.

First we will create a simple xml document called images.xml. Here is the code:

<images> <image image="img/img1.jpg" caption="Brian Self- Flash Programmer"/> </images>

We are only going to use one simple xml node to keep it simple. Save this file in a directory called xml.

Then create an FLA and call it “Main.” Put a dyncamic text field on the stage with an instance name of myText and be sure to embed the font, uppercase, lowercase and punctuation. Then draw a rectangle and hit F8 to make it a movieClip and give it an instance name of myImageHolder.

Then create an AS layer and paste in this code:

// create the XML variable var xml:XML = new XML(); // you must ignore whitespace xml.ignoreWhite = true; // the function that is called when the xml is loaded xml.onLoad = function() { // tells you the number of child nodes var nodes = this.firstChild.childNodes; // tells you how many items you have numOfItems = nodes.length; // attach icons for (var i = 0; i<numOfItems; i++) { // attach image to the myImageHolder MovieClip myImageHolder.loadMovie(nodes[i].attributes.image); // set the text myText.text = nodes[i].attributes.caption; } }; // load the xml xml.load("xml/images.xml");

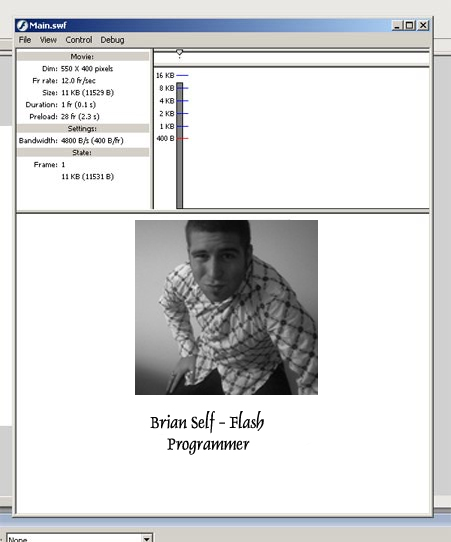
If you run this you will see that the content is now populated from the xml page.

Simple as that! Remember, in coding and designing there is always an increasingly difficult way of doing things and a elequently simple way. Keeping it simple makes debugging a quick and painless process and always assume you will have to debug at some point in your designing life.

Setting Up A Photo Gallery In Under An Hour

January 18, 2008 By Brian Self

I get asked a lot about the topic of photo galleries from budding designers and clients and they all ask the same thing. “What’s a really easy and fast photo gallery to set up and use?”

And then they ask me: “What do you think about Drupal?”

Don’t get me wrong, Drupal is great but I wouldn’t use “Drupal photo gallery” and “easy and fast to set up” in the same sentence. When I think of simple, I try to find something that can take as much work off my plate as possible; Thats why I opted to learn Ruby On Rails instead of Jakarta Struts.

When I began researching all the different image gallery frameworks, the one common denominator that seemed to get in the way of keeping “quick” in mind was that they all required a database to be set up. Except for when I came across a lovely, flexible image gallery PHP web application called Singapore. With Singapore you can administer directly via FTP or using the web based admin which features advanced metadata & user permissions; Fully template driven & multilingual. I am going to give a quick run-through in setting up Singapore and you will see really quickly why I chose to go with it when I need to quickly throw up a photo gallery.

Step 1

Download Singapore and upload it to your hosting account.

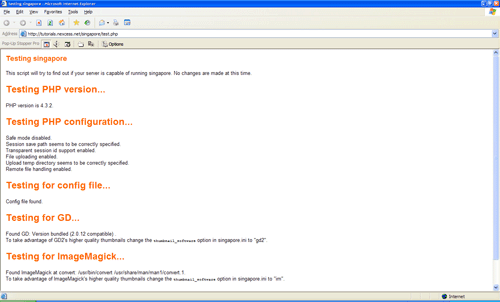
Once that is done we can take a run with the ‘test.php’ file to make sure our server can handle running Singapore. Point your browser to ‘http://www.whateveryourwebsiteaddressis.com/singapore/test.php’. The page will test everything and it should look something like this:

Server test page

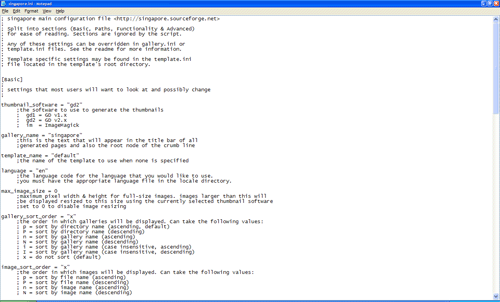
The test will let us know that if we want higher quality thumbnails, we need to change the ‘thumbnail_software’ option in the ‘singapore.ini’ file. In the ‘singapore.ini’ file, change the value for the ‘thumbnail_software’ variable to ‘gd2’. Your screen should look like this:

The other settings in the ‘singapore.ini’ file can be messed around with as much as you desire. If you cannot edit the .ini file in your ftp client, just edit it on your desktop and upload it to replace the existing file.

Step 2

You need to change the permissions on some of the folders in order for the script to write to them. You can do this using the CHMOD command in your FTP program. We’ll change the permissions as follows:

  • CHMOD the ‘data’ folder and all the files and folders in the ‘data’ folder to 777
  • CHMOD the ‘galleries’ folder and all the files and folders in the ‘galleries’ folder to 777

Step 3

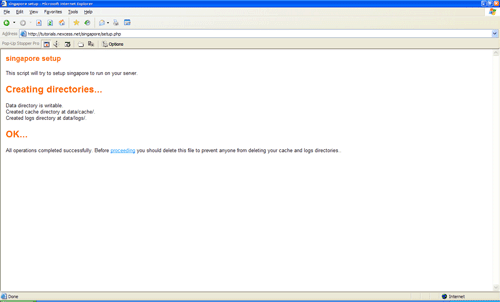
Now jump into ‘setup.php’ to setup Singapore or click the ‘Proceed to setup’ link at the bottom of the test page. Your screen should look like this:

Main setup page

Once this is finished make sure you delete the ‘setup.php’ so that you keep your head above the security issue water. Click on the proceed link and then…

Step 4

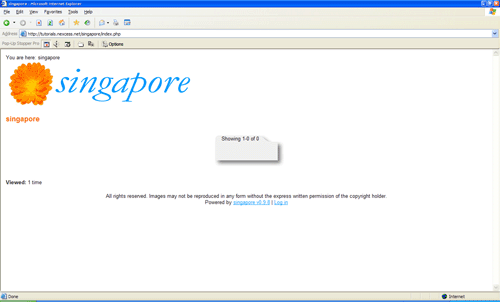
Your screen should look like this:

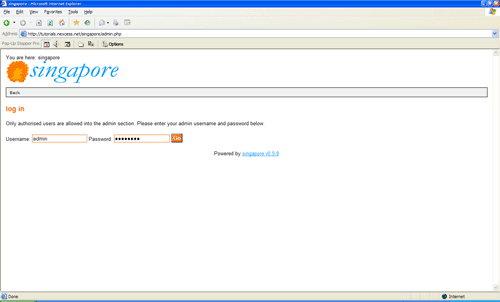
Click ‘Log in’ and enter ‘admin’ for the username and ‘password’ for the password. Your screen should look like this:

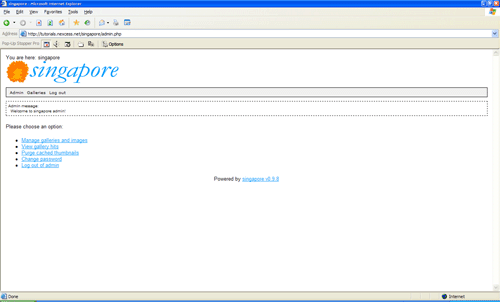
This will throw you into the Singapore main control panel page. Your screen should look like this:

Main admin control panel page

You can now use the control panel to customize and manage the gallery and just don’t forget to change your password!

Final words

Remember, it’s not what you use to get your clients site up and running as much as it is the amount of time it took to get set up and its simplicity to its end users that counts. At the end of the day, my clients are more concerned about having quick turnovers and working sites. Sometimes we can get caught up in the lingo, brands and “techyness” that makes us geeks drool like a kid in a candy store and makes our clients scream like a kid at the dentist.

Code & Tutorials

Which Front-End Development Languages Will Grow in 2017?

Your Guide to Leveraging APIs as a Developer

Bitcoin Processing Website Integration For Web Developers

Website Security For 2016 That All Developers Need To Know

5 Reasons You Need to Be Using jQuery

About Devlounge

Want to read more about Devlounge, or maybe you want to contact us, or even advertise? Oh, and don't forget to subscribe to updates!

The Best of Devlounge

4 Tips to Personalize E-Commerce Websites

Search