A while back, I discovered some fantastic plug-in filters you can buy to spiff up your web images that work wonderfully with Photoshop and Paint Shop Pro. I thought it would be fun to give a quick blow-by-blow on some of these filters just to give you an idea of what to expect from some of these great little additions to your graphic design software. Priced from as low as $15 per individual filter, or $49 for certain bundles containing four or so different filters, you simply can’t go wrong with these creative accessories.
Testing Plugins from Flaming Pear Software
This amazing software company has a fantastic group of plug-in filters available for purchase on their site, and each one is available to you for a 30 day free trial download! I highly recommend all the plug-ins this company offers. I have chosen five of their different effect filters to discuss in this article, and I hope you will go and check them out and grab your trial downloads…you won’t regret it!
Super Blade Pro – $30
This plug-in filter is an absolute “must” for web designers who are looking for some fresh ideas to create unique, attractive web buttons. Once you install Super Blade Pro, it is a breeze to create a basic web button, then apply the filters by clicking Filter>Flaming Pear>Super Blade Pro. Once the filter quickly launches, you are shown hundreds of different variations, colors, textures and styles that you can apply to your plain ole button. I was floored by the beauty and uniqueness of each of the random styles you can sift through and choose from just by clicking a pair of dice. If you don’t happen to find anything that suits your fancy from their myriad of preset designs, you can tweak and torque the many settings and create your own variations from there. The simplicity of this plug-in will amaze you, and the results speak for themselves. Here is an example of what Super Blade Pro looks like once you choose it from your Filter menu in Photoshop:
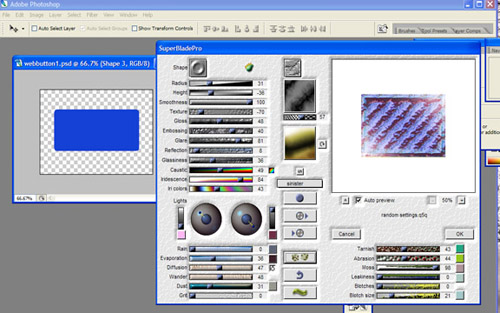
I was extremely impressed with Super Blade Pro for its fantastic design choices and also for its ease of use. This effect filter gets a rousing standing ovation from me.
Flood – $20 (or $50 when purchased in the Photography Pack, bundled with Aetherize, Melancholytron, and Mr. Contrast)
I have to say this effect is probably the most fun to use of all the Flaming Pear filters. It is exciting to see the results when you open a photo of say, a sunset, for instance, then apply the Flood filter to create your own beautiful “digital water scene” that suddenly appears before your eyes. Add a few of your other extracted elements and you end up with a stunning, creative digital illustration that will amaze you and everyone who sees it. The settings for the Flood waters you immerse your image in vary from waviness to complexity; and wave height to brilliance. It is just a stupendous effect that I personally never tire of. Take a look at the example below to see what I mean:
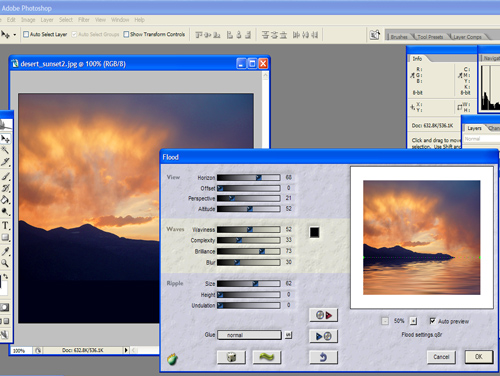
Once you adjust the settings to get the effect level you desire, and save your base image you’ve just ‘flooded,’ add some of your other graphic elements, such as I have done in the next example below, and enjoy the tranquility of your beautiful creation.

Whatever your desire in a water scene, whether you want to create a glassy pond or a raging hurricane, you can create all things watery with this versatile filter. Flood gets a very lengthy standing ovation from me.
Aetherize – $20 (or $50 when purchased in the Photography Pack, bundled with Aetherize, Melancholytron, and Mr. Contrast)
Aetherize is as its name suggests, an ethereal treatment for any image you choose. This filter is pretty versatile, and allows you to take mundane snow scene and turn it into a wintery wonderland, or a fairytale setting that looks amazing. A snow scene is what I used to illustrate Aetherize, but you can use anything at all. There are tons of well thought-out presets in this filter set for you to try, or you can make your own variation by tweaking to your heart’s content. For an example, I opened an image I captured of some trees with snow falling on them. You can see my results below:
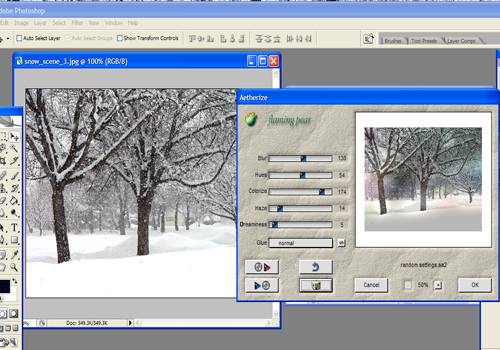
After I opened my snow scene image, I clicked Filter>Flaming Pear>Aetherize, and started experimenting with the different presets. I settled upon the one above that has some interesting and ‘dreamy’ looking colorizations to it. I then did a little tweaking and adding of other elements, and ended up with the dreamy scene below:

I also performed another little trick with this image; I combined filtration by applying the Flood filter to this after the Aetherize filter, to make an even more fantasy-looking composite image. This filter is really spectacular for sending any of your photos into an ethereal or dreamy direction, and gets a very enthusiastic round of applause from me!
Melancholytron – $20 (or $50 when purchased in the Photography Pack, bundled with Aetherize, Flood, and Mr. Contrast)
For my last filter review today, I’ve decided to talk about Melancholytron. This filter isn’t a really heavy-duty effect module like some of the others mentioned above, but it is a lovely addition for those who want to give a bit of an ‘old timesy’ look to a photo by blurring out photo edges and adding a sepia vignette to it. This effect works just splendidly on images that are already heading toward sepia tone, or even on b/w images as well. For this example I am using a photo that I ‘borrowed’ with permission from a friend of mine, Aussi photographer Michael Rowley, who captured a wonderful photo of a pair of glasses on an open book. I felt that this image would really be terrific with the addition of the Melancholoytron filter. See the example:
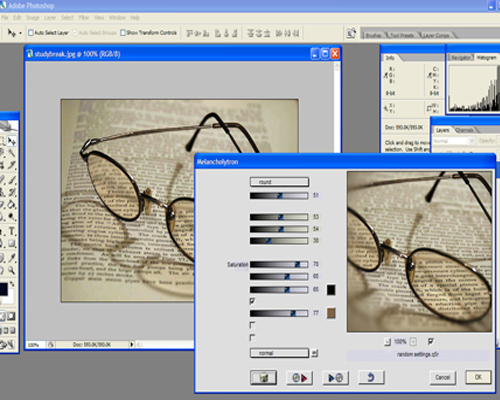
Melancholytron has many different presets you can choose from, and similarly to the other filters discussed here, also allows you to tweak as much or as little as you like using the settings sliders. For Michael’s lovely photo, I decided on a round vignette with a dark sepia tone to it, which enhances the tinting in the lenses, while gently blurring out the edges of the picture. Below is the finished photo after I also adjusted the levels slightly using Image>Adjustment>Levels. I felt this image just ‘come alive’ after applying the filter. Melancholytron gets an extremely heartfelt round of applause from me.

Photo: Michael Rowley, http://www.keepsakesphotography.com.au
Wrapping Up
With so many plug-in effect filters out there, it was really difficult to pick out just a few to review and discuss, and I barely just scratched the surface here by covering only one of the many plug-in software developers. However, I do plan to acquire more effect filter plug-ins in the near future, and I will certainly share some input with you on those as I work my way through them! It is absolutely amazing how many terrific creative tools are available, and just a few clicks and a free trial download away from you at anytime.
