A couple of weeks ago, someone on the Six Apart Professional Network mailing list asked if there was a plugin for Movable Type that would create a printer-friendly version of posts similar to WP-Print. Looking at a sample of WP-Print’s output, I realized that no plugin was necessary — I could do it with a template. With a bit of work and the help of a very powerful MT plugin, I’m proud to say I’ve succeeded. And now I want to show you how.
Before we begin, I should make clear that what I’ve done here doesn’t come close to recreating all that WP-Print does. In particular, WP-Print has several settings that control what gets printed and how the print version looks. For that level of customization, you would need to write a full-fledged plugin. I also want to thank the developer of WP-Print, Lester Chan, for releasing his plugin under the GPL. My own solution uses his print CSS, along with a modified version of his print template.
First thing we need to do is install the MT-Collect plugin. This plugin was written by Kevin Shay and, as he describes it, MT-Collect:
…implements a set of template tags for collecting information from specified HTML tags in your entries, and collating and displaying that information.
This lets you do things like build a list of terms used in an entry and present it as a glossary. Or, as we’re doing here, make a list of links in the post.
MT-Collect hasn’t been updated in several years, but I successfully installed it on MT 4.21 and have had no problems using it so far. You can install it just like any other plugin.
Our new print version requires two things: A print CSS file and an entry archive template. To make this easier, I’ve zipped up the two files you’ll need for this tutorial. You can download them here.
You can upload the print-css.css file directly to your server. Or, you can create a new index template in your MT blog and copy the contents into that template. Put print-css.css as the output file, then save and publish.
Then, create a new entry archive template. If you’ve never created one before, see my previous post on MT templates for more information. Once you create the template, paste the contents of print-entry.tmpl into the new template and name it something like Print Entry. Save the template, then click on Template Options. You’ll need to add a new archive mapping. Click on Create Archive Mapping, then choose a type of Entry and click the Add button. You’ll want a custom mapping, so choose custom from the drop-down and edit the mapping. Here’s mine:
%y/%m/%-b-print.html
One thing you do not want to do is check the box next to this custom mapping. That will make it the default for links to that post, so people visiting your home page would go to the print versions of your posts, rather than the regular archive. Just leave it unchecked and you’ll be fine.
Now, before we publish our template, let’s look at some of the code so we know what’s going on. We start just below the <body> tag:
[HTML]
[/HTML]
<MTCollect> is a block tag, and must surround the entire section of the template where you want to use MT-Collect tags. the tags attribute tells it what HTML tags we’re interested in. In this case, we only want links. A bit further down, we collect those links with the <MTCollectThis> tag:
[HTML]
[/HTML]
The show="1" attribute tells <MTCollectThis> that we want to output everything within its block, not just collect links from it. For each HTML tag you’re collecting, you can add an attribute that will create output before and after each one. Within that attribute, anything before the “/” will be before the tag, and the rest after. In this case, we’re putting the index of the link in brackets before the link, and nothing after. The documentation for MT-Collect describes all your options for this.
Now that we’ve collected our links, we can output them at the end of the entry:
[HTML]
URLs in this post:
[<$MTCollectedIndex$>] <$MTCollectedAttr attr="href"$>
[/HTML]
<MTIfCollected> checks whether we found any a tags. Then the <MTCollected> tag loops through those tags so we can use them to produce output. In this case, we want to output the corresponding index and the href attribute for each link.
After that, we just close the <MTCollect> tag, and we’re done with this template. Odds are, you’ll want to add a print link to your regular individual archive. For mine, I added the following right after the <mt:IfPingsActive> block in the Entry template:
[HTML]
|
[/HTML]
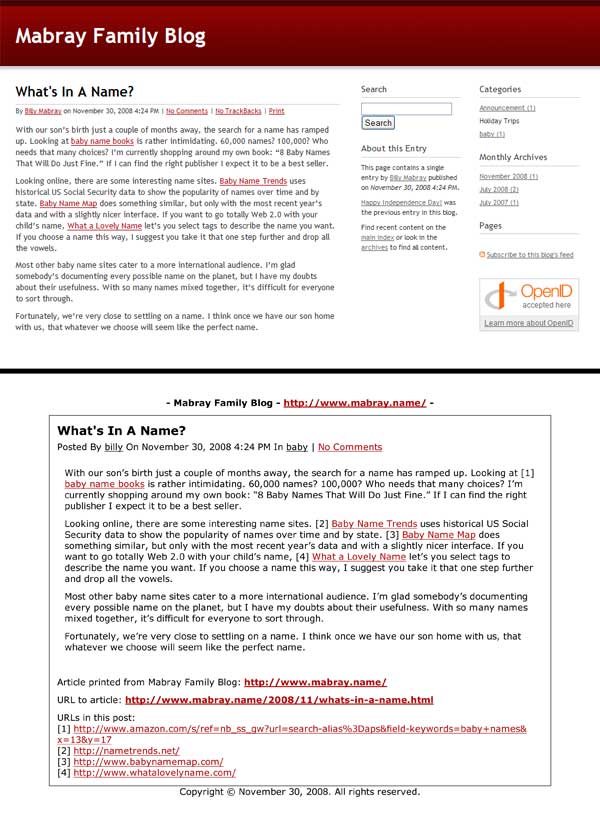
Save that template and publish your site. When you click a print link it should take you to a version of your post that’s perfect for printing — complete with a list of URLs at the bottom. If the styling seems off, make sure your print CSS is on your server and that you’re linking to it correctly in the template. Here’s a sample of a blog post using the default MT templates and our new print version:

Something else to consider here: Since printing tends to be infrequent, your print entry archive would be a perfect candidate for dynamic publishing. That way, you don’t clutter your server with a bunch of files you may or may not need. Unfortunately, the MT-Collect plugin is from pre-dynamic publishing days, so it won’t work here. If you want to go dynamic, you’ll need to replace this with a PHP solution.
Have tips for printing blog posts? Let us know in the comments.
