There are lots of tutorials floating around that show you how to “set your typefaces on fire”, but this quick little tip using Adobe Photoshop is one that is really fast and effective for you to experiment with, and make your blazing impression on any text that suits your fancy. Try this quick text treatment next time you are looking for a speedy, easy way to have your website banner burst into flames…
Steps
Open up a new document in Photoshop. I made mine 8 inches wide by 6 inches high, 72 ppi, Grayscale, and the Background should be White. Make sure your default colors are Black foreground color, white background color (press D on your keyboard to reset this default color scheme). Fill the transparent document you just opened by clicking ALT>Backspace (PC). Next, click on the Text tool in your toolbar, and set the default colors to the opposite scheme, white over black, by pressing the X key on your keyboard. You are going to type something in white now on your black background. Choose a nice, bold, blocky typeface, and set the size to about 100 point. See the example shown:
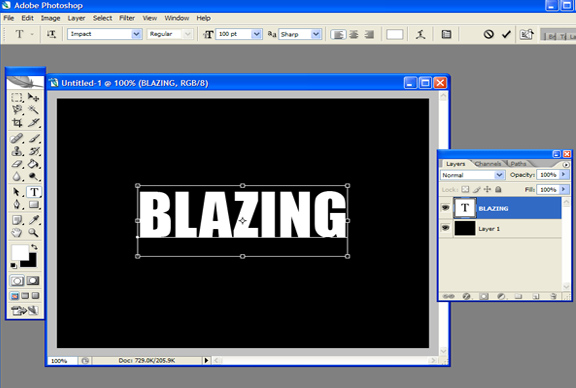
The next step is to rasterize the type by clicking Layer>Rasterize>Type. After that, rotate the canvas counter clockwise using: Image>Rotate Canvas>90 degrees counter clockwise, then apply the first effect filter for this lesson which is as follows: Filter>Stylize>Wind>Blast from Left. Repeat this step one more time to lengthen the blast a little. See example:
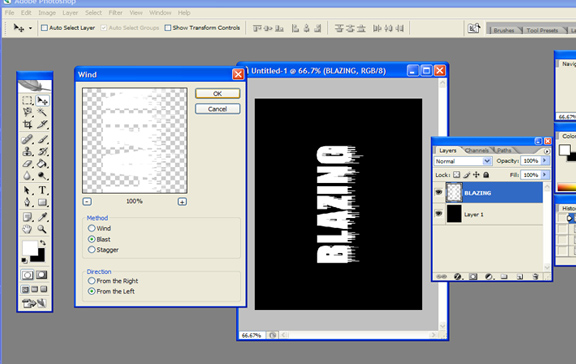
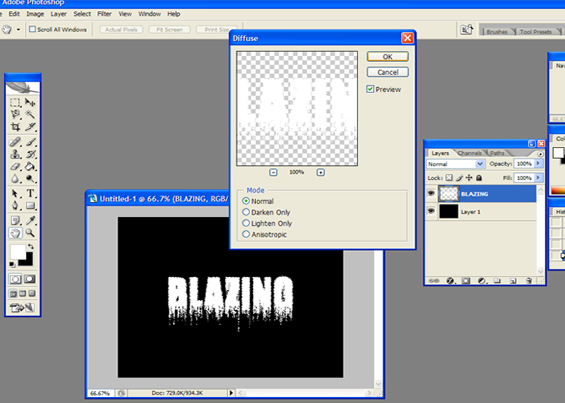
Now you will need to rotate the image 180 degrees: Image>Rotate>180 degrees, so you can blow the wind effect on the other side as well by using: Filter>Stylize>Wind>Blast from Left. When finished, rotate the canvas back to normal by: Image>Rotate>90 degrees counter clockwise. It is time to add some more effects to your type. First, use this: Filter>Stylize>Diffuse>Normal. See example:
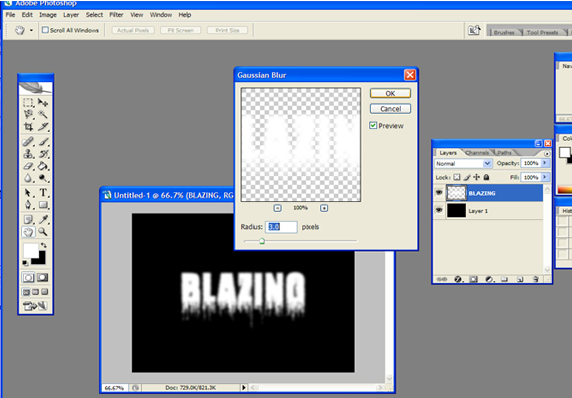
Then, apply the next effect as follows: Filter>Blur>Gaussian>Adjust slider to 3. Example:
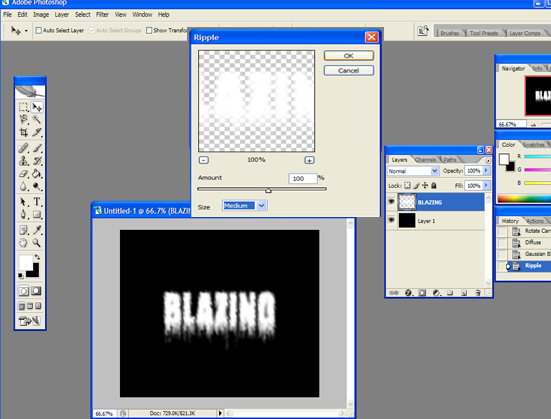
One more effect and we are nearly finished: Filter>Distort>Ripple>100 percent>Medium. See example:
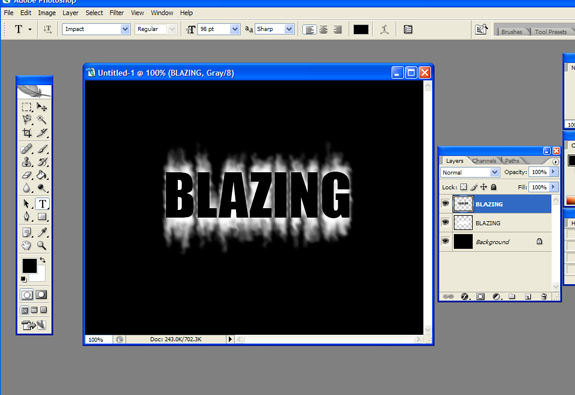
Now that we are done with the effects, let us type the word over again in black (switch default colors back to black). Position this type layer over the original one that is now distorted and rasterize the type: Layer>Rasterize>Type. After you rasterize this layer, it’s time to click Layer>Flatten Image.
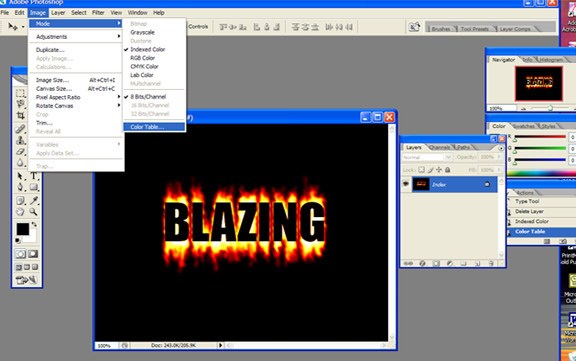
So, you are probably thinking “what happened to flaming type?” Well, here are the final steps to a really hot effect: Click Image>Mode>Indexed Color. Nothing much will happen in that step, however, the next one: Image>Mode>Color Table, and choose Black Body from the drop down menu. Now you should see the colors of fire all around your type, concentrated at the top and bottom. See example:
For your final step in this process, you probably should crop this and convert this file to RGB ready for web use. Again, click Image>Mode>RGB, and save your file, and you’ll have a super fun little text effect to heat up your site! Here’s the cropped final:

Wrapping Up
Obviously there are many techniques for making this type of flaming text treatment; I just thought this was a good “quick and dirty” version for you to try out in a jiffy. You can also do a lot more experimenting with this, such as make the text a different color all together, such as blue or yellow, and add some effects to that like a drop shadow or outer/inner glow. You can experiment with many, many different base fonts as well; I just used a very plain, bold font here called Impact (you should have it). There are many other choices. Photoshop is very flexible, so you have a lot of options open to you!
